

Mounting a floating shelf yourself is absolutely doable, even if you’re not particularly “handy.” Here’s a guide to help you get it on the wall safely and straight, without calling a pro.
Before You Start: Safety and Planning
-
Decide what the shelf will hold (a few frames vs. heavy books) so you can choose the right hardware and anchors.
-
Always aim to fasten into at least one wall stud; shelves that use only light plastic wall plugs can sag or pull out over time.
-
If you rent, check your lease first and be prepared to patch small holes later.
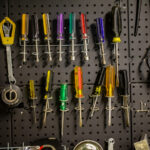
Tools and Materials You’ll Need
You don’t need a full workshop; a basic DIY kit is enough:
-
Floating shelf with hidden bracket or cleat system
-
Drill or impact driver
-
Drill bits (for wood studs and for your wall type: drywall, brick, or concrete)
-
Screws (usually supplied with the shelf; if not, use quality wood screws or masonry screws)
-
Wall anchors or toggle bolts for non‑stud locations
-
Stud finder
-
Level (a small spirit level or laser level)
-
Tape measure and pencil
-
Masking tape (optional but very handy)
Tip: If you don’t own a drill, many hardware stores rent tools by the hour or day, and some shelves are designed for very light loads and simpler installation.
Step 1: Choose the Right Spot
-
Look at the surrounding furniture and artwork so the shelf doesn’t look oddly high or low. A common height is roughly eye level or just above, but adjust for your room.
-
Check clearance for doors, cabinets, and windows so nothing bumps the shelf when opened.
-
Use masking tape to “outline” where the shelf will go, then step back and decide if the position looks right.
Step 2: Find Studs (or Plan Anchors)
-
Turn on your stud finder and run it slowly along the wall where you want the shelf. Mark stud positions lightly with a pencil.
-
Ideally, your shelf bracket will span at least one, and preferably two, studs. This is especially important for heavy items like books or dishware.
-
If there’s no stud where you want the shelf, plan to use strong wall anchors or toggle bolts that are rated for the weight you need.
Rule of thumb: A well‑installed floating shelf on studs can easily handle typical decor and books, while shelves relying only on anchors should be reserved for lighter loads.
Step 3: Mark Your Drill Points
-
Hold the metal bracket or cleat against the wall where the shelf will sit.
-
Place a level on top of it and adjust until perfectly straight.
-
Mark the screw holes with a pencil through the bracket.
-
Double‑check that at least one of those marks lines up with a stud mark; if not, slide the bracket slightly but keep it level.
If you’re nervous about getting it level, lightly stick the bracket in place with painter’s tape while you adjust and mark.
Step 4: Drill the Holes
Your drilling method depends on wall type:
-
Drywall with studs: Use a bit slightly smaller than your screws for pilot holes into studs.
-
Drywall without studs: Use the drill size recommended on your anchor package and pre‑drill for the anchors.
-
Brick or concrete: Use a masonry bit and drill slowly; insert masonry anchors afterward.
Vacuum or brush away dust so anchors and screws seat properly.
Step 5: Install Anchors and Bracket
-
Push or tap wall anchors into the pre‑drilled holes where there is no stud. They should fit snugly.
-
Hold the bracket or cleat back up to the wall, line up the holes, and insert screws.
-
Tighten screws gradually, alternating between them so the bracket pulls tight and stays level rather than twisting.
-
Re‑check with the level; if it’s off, loosen slightly, adjust, and tighten again.
For heavy‑duty shelves, use proper structural screws or toggle bolts instead of cheap, thin screws.
Step 6: Mount the Shelf
Different floating shelves attach in slightly different ways, but the basic ideas are similar:
-
Rod‑style brackets: The rods stick out from the wall; you slide the hollow shelf onto them until it sits flush.
-
French cleat system: A sloped “wall cleat” is screwed to the wall and a matching cleat is attached to the back of the shelf; the shelf drops down and locks onto it.
-
Hidden mounting strip: A narrow strip or frame is fixed to the wall and the shelf slides over or screws into it from underneath or behind.
Slide the shelf into place, then:
-
Check alignment from the front and from the side.
-
If the design allows, add small screws from underneath into the bracket or cleat to lock the shelf in and prevent wobble.
Step 7: Test the Strength (Before Decorating)
-
Press down gently on the front edge with your hand to feel for movement.
-
Add weight gradually: start with something light, then add more over a day or two if you plan to store heavier items.
-
If the shelf tilts or feels loose, remove the weight and re‑check:
-
Are all screws tight?
-
Did anchors fully expand in the wall?
-
Is at least one screw solidly in a stud?
-
Never exceed the weight rating stated by the manufacturer, and remember that weight placed at the front edge stresses the hardware more than weight close to the wall.
Quick Tips for a Pro‑Looking Result
-
Use a small piece of masking tape on the wall where holes will go, then mark on the tape. This makes pencil marks easy to remove and reduces chipping of paint when drilling.
-
If you’re installing multiple shelves, cut a spacer from scrap wood (for example, 25 cm tall) and use it between shelves instead of measuring every time.
-
For a minimalist look, choose shelves with concealed hardware and a thickness that can hide the bracket or cleat.
-
Wipe the shelf clean after installation and before styling; sawdust and wall dust can scratch decor items.
Common Mistakes to Avoid
-
Using only cheap plastic plugs for a heavy shelf (they can pull out under load).
-
Skipping the level and eyeballing it—your eyes will notice even a small tilt once you add framed photos.
-
Mounting too close to a door frame or cabinet, leaving no room for items to sit comfortably.
-
Ignoring wall type: brick, concrete, and hollow drywall all need different screws and anchors.
When to Call in Help Anyway
Even a confident DIYer should consider help if:
-
The wall hides plumbing or electrical lines where you plan to drill.
-
You’re installing very long or extra‑deep shelves for heavy loads (like a full library or kitchen appliances).
-
You feel unsure about the right anchors for your wall type.
For most everyday floating shelves, though, a bit of patience, a level, and the right anchors are all you need.
With these steps, you can mount a floating shelf that looks clean, feels solid, and holds up over time—all without professional help.